The easiest way to install directly the pool is here
These new “Mac images” now install print queues with the IPPS protocol (instead of SMB which is blocked by the latest Apple security updates and LPD which was complicated)
Download images
You just have to double-click on it and accept the messages of authorization.
The package (SecurePrintStudent4.app or SecurePrintStaff5.app) does everything, you don’t have to install the driver by yourself.
A single file will be installed, named
SecurePrint4MacIPPS
or SecurePrint5MacIPPS
To simplify, there is no longer any distinction between a Black/White queue and a color queue.
To print in Black and White, you will have to select the Black and White option on the printing interface
Unfortunately, it is no longer possible to change print options directly on the printer just before printing. All options must be set on the computer.
Here is a short procedure on the different installation steps
<<<<<< LDP Print Queue Procedure >>>>>>>
If the automatic installation does not work, and for single-function printers, switch to manual installation.
Step 1: Finding the printer address
For Mac OS, with IPPS, a printer address has the following format:
https://<print_server>/printers/<printer_name>/.printer
Here is the list of available servers ; we have multiplied them in order to better dispatch the printing jobs
- printEPFL1 : access to the students deserved printing pool
- printEPFL2 : access to the staff members deserved printing pool
- printEPFL3 : access to the mono-function printers and plotters.
- printEPFL4 : access to the students deserved printing pool
- printEPFL5 : access to the staff members deserved printing pool
Here are the names of the printing pools for Mac
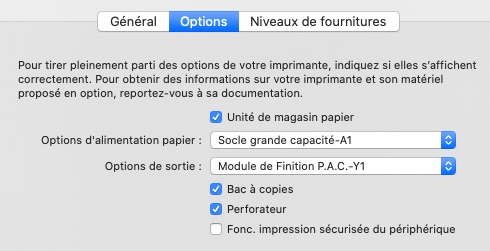
- SecurePrintMac-Col, which allows
- eco stapling (staple free)
- 4 holes punch
- short edge duplex
- eco stapling (staple free)
- SecurePrint-BW
- SecurePrint-Color
For example, the address of a color pool for a student can be :
https://printEPFL4.epfl.ch/printers/SecurePrintMac-Col/.printer
If you need to find the name of an off-pool printer:
Use the page search a printer
Step 2: Driver installation
- If it has not already been done, it will be necessary to install a PPD file, or a driver, for the printer you need :
>>> Drivers installation page <<<
Step 3: Printer installation (Example with SecurePrint-Color)
-
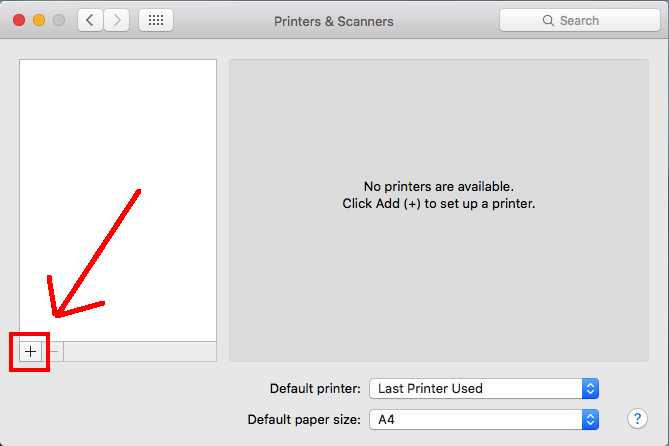
- Go to “System Preferences”
“Printer and scanners” > click on the ‘+’ button.
- Go to “System Preferences”
- Then click on the icon “Advanced settings”. This may takes a few seconds…
NB: if the icon “Advanced settings” is not displayed, use “Ctrl” + “click” on the toolbar and then choose “Customize Toolbar…”.

-
- Then you can drag and drop the “Advanced settings” icon on the toolbar.

- Then you can drag and drop the “Advanced settings” icon on the toolbar.
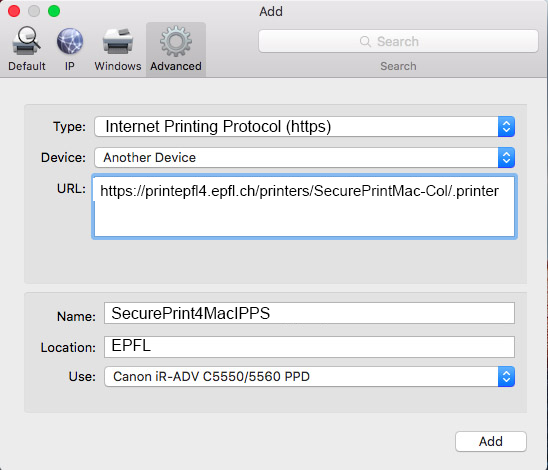
Example : installation of “SecurePrint-Color” pool
- Type : Internet Printing Protocol (https)
- Device : Another Device
- URL : https://PrintEPFL4.epfl.ch/printers/SecurePrintMac-Col/.printer
- Name: SecurePrint4MacIPPS
- Location: EPFL
- Use : Select the printer driver… (or the newly downloaded PPD file)
Then you will have to specify a few more settings. You can modify them at any time.
Step 4: (only for Mac OS 10.7 or 10.8): a command in the terminal to allow authentication
In order to avoid authentication problems, you may need to execute this command with the application Terminal:
lpadmin -p SecurePrintColor -o auth-info-required=username,password
Be careful !
This command must be written exactly like this, without replacing ‘username’ or ‘password’ with your own information.
Step 5- Authentication
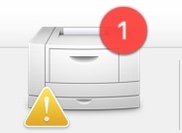
Sometimes, after your first printing process, the job will be paused.
A dialog box will appear. You will have to give your username and your password.
If the authentication does not work, you may need to use
intranet\<your_username> as username.
NB: the character \ (backslash) is obtained by pressing alt + shift + 7.
Authentication example with Mac OS 10.10, pool SecurePrintMac-Col
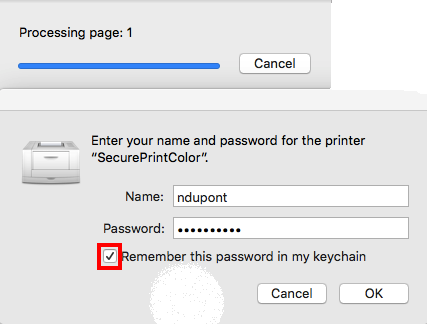
NB: If you choose “Remember this password in my keychain, you will not be forced to retype it for each print
Step 1: Finding the printer address
For Mac OS, with LPD, a printer address has the following format:
lpd://<username>@<print_server>/<printer_name>
Here is the list of available servers ; we have multiplied them in order to better dispatch the printing jobs
- printEPFL1 : access to the students deserved printing pool
- printEPFL2 : access to the staff members deserved printing pool
- printEPFL3 : access to the mono-function printers and plotters.
- printEPFL4 : access to the students deserved printing pool
- printEPFL5 : access to the staff members deserved printing pool
Here are the names of the printing pools for Mac
- SecurePrintMac-Col, which allows
- eco stapling (staple free)
- 4 holes punch
- short edge duplex
- eco stapling (staple free)
- SecurePrint-BW
- SecurePrint-Color
For example, the address of a color pool for a student can be :
lpd://[email protected]/SecurePrintMac-Col
If you need to find the name of an off-pool printer:
Use the page search a printer
Step 2: Driver installation
- If it has not already been done, it will be necessary to install a PPD file, or a driver, for the printer you need :
>>> Drivers installation page <<<
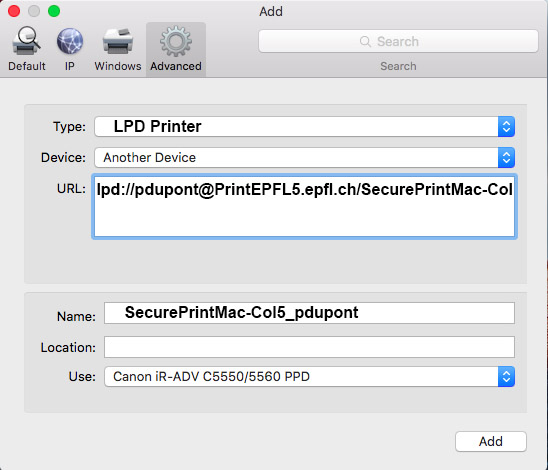
Step 3: Printer installation (Example with SecurePrint-Color)
-
- Go to “System Preferences”
“Printer and scanners” > click on the ‘+’ button.
- Go to “System Preferences”
- Then click on the icon “Advanced settings”. This may takes a few seconds…
NB: if the icon “Advanced settings” is not displayed, use “Ctrl” + “click” on the toolbar and then choose “Customize Toolbar…”.
-
- Then you can drag and drop the “Advanced settings” icon on the toolbar.
- Then you can drag and drop the “Advanced settings” icon on the toolbar.
Example : installation of “SecurePrint-Color” pool
- Type : LPD printer
- Device : Another Device
- URL : lpd://[email protected]/SecurePrintMac-Col
- Name: SecurePrintMac-Col5_pdupont
- Location: EPFL
- Use : Select the printer driver… (or the newly downloaded PPD file)
Then you will have to specify a few more settings. You can modify them at any time.
Step 4: (only for Mac OS 10.7 or 10.8): a command in the terminal to allow authentication
In order to avoid authentication problems, you may need to execute this command with the application Terminal:
lpadmin -p SecurePrintColor -o auth-info-required=username,password
Be careful !
This command must be written exactly like this, without replacing ‘username’ or ‘password’ with your own information.
Step 5- Authentication
Sometimes, after your first printing process, the job will be paused.
A dialog box will appear. You will have to give your username and your password.
If the authentication does not work, you may need to use
intranet\<your_username> as username.
NB: the character \ (backslash) is obtained by pressing alt + shift + 7.
Authentication example with Mac OS 10.10, pool SecurePrintMac-Col
NB: If you choose “Remember this password in my keychain, you will not be forced to retype it for each print
Step 1: Finding the printer address
For Mac OS, a printer address has the following format:
smb://<printserver>/<printer name>
Here is the list of available servers ; we have multiplied them in order to better dispatch the printing jobs
- printEPFL1 : access to the students deserved printing pool
- printEPFL2 : access to the staff members deserved printing pool
- printEPFL3 : access to the mono-function printers and plotters.
- printEPFL4 : access to the students deserved printing pool
- printEPFL5 : access to the staff members deserved printing pool
Here are the names of the printing pools for Mac
- SecurePrintMac-Col
- SecurePrint-BW
- SecurePrint-Color
For example, the address of a color pool for a student can be :
smb://printEPFL4/SecurePrintMac-Col
If you need to find the name of an off-pool printer:
Use the page search a printer
Step 2: Driver installation
- If it has not already been done, it will be necessary to install a PPD file, or a driver, for the printer you need :
>>> Drivers installation page <<<
Step 3: Printer installation (Example with SecurePrint-Color)
-
- Go to “System Preferences”
“Printer and scanners” > click on the ‘+’ button.
- Go to “System Preferences”
- Then click on the icon “Advanced settings”. This may takes a few seconds…
NB: if the icon “Advanced settings” is not displayed, use “Ctrl” + “click” on the toolbar and then choose “Customize Toolbar…”.
-
- Then you can drag and drop the “Advanced settings” icon on the toolbar.
- Then you can drag and drop the “Advanced settings” icon on the toolbar.
Example : installation of “SecurePrint-Color” pool
- Type : Windows (Windows printer via spool)
- Device : Another Device
- URL : smb://PrintEPFL1/SecurePrint-Color
- Name: SecurePrintColor
- Location: –
- Use : Select the printer driver… (or the newly downloaded PPD file)

Then you will have to specify a few more settings. You can modify them at any time.
Step 4: (only for Mac OS 10.7 or 10.8): a command in the terminal to allow authentication
In order to avoid authentication problems, you may need to execute this command with the application Terminal:
lpadmin -p SecurePrintColor -o auth-info-required=username,password
Be careful !
This command must be written exactly like this, without replacing ‘username’ or ‘password’ with your own information.
Step 5- Authentication
Sometimes, after your first printing process, the job will be paused.
A dialog box will appear. You will have to give your username and your password.
If the authentication does not work, you may need to use intranet<your_username> as username.
NB: the character (backslash) is obtained by pressing alt + shift + 7.
Authentication example with Mac OS 10.10, pool smb://printEPFL1/SecurePrint-Color
NB: If you choose “Remember this password in my keychain, you will not be forced to retype it for each print
Waiting for authentication
The first time you try to print, the system should ask for your credentials.
The window may not appear right away.
In that case,
- Click on the hopping icon
- Click the small box to the right (reload) of the print job queue.
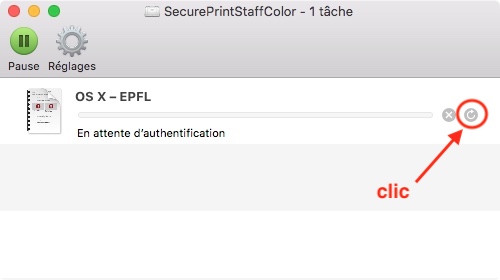
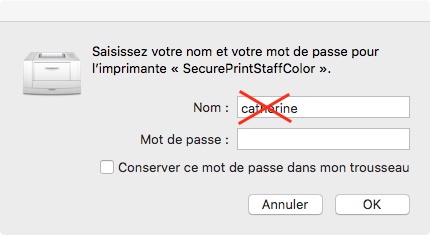
- Then, you can enter your login details (Gaspar username and password)
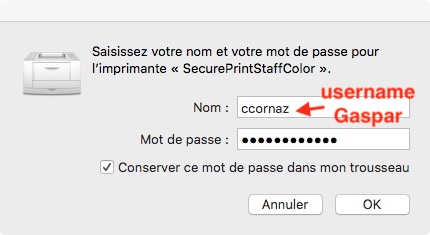
NB: to avoid having to enter these each time you print, check the option “Keep this password in my keychain”
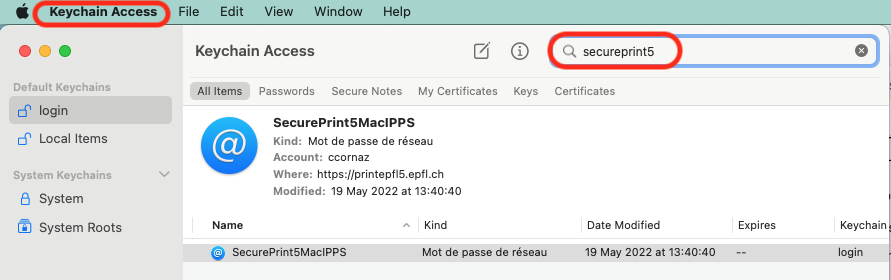
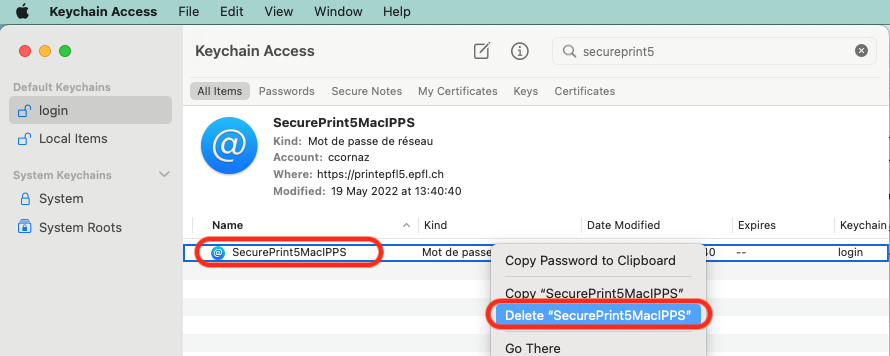
If no window opens to ask you to authenticate yourself, you will have to delete the password saved in your “Keychain access”
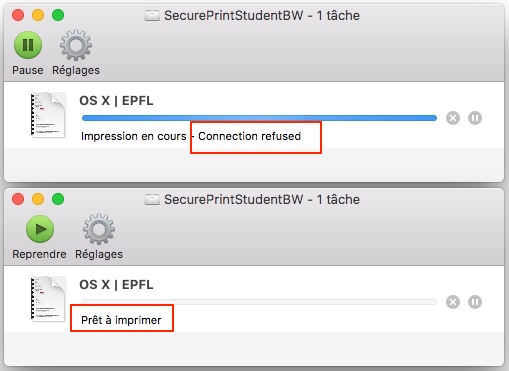
Connection refused
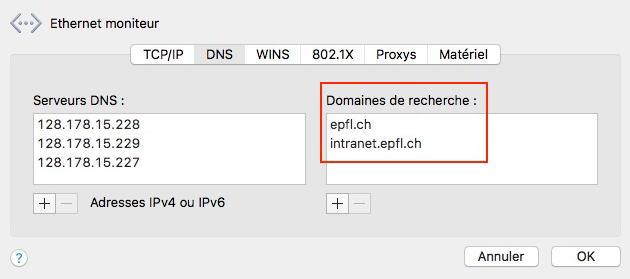
Your Mac must include in its network configuration the default search domains “epfl.ch” and “intranet.epfl.ch“. This is due to the “smb://PrintEPFL2/SecurePrint-Color” connection URL that is not qualified with the domain.
The configuration :
- Go to “System Preferences” | Network
- Choose the Ethernet interface, then “Advanced“
- Choose the “DNS” tab
- In the “Search Domains” box, add “epfl.ch” and “intranet.epfl.ch” using the “+”
- Click “OK
For those who are on Mac Big Sur> = 11.3 and who notice a time-out of one minute when printing (Connecting to printer), it is in fact an SMB problem, which is set by default in “multichannel” mode, and which poses problems on servers which are not configured accordingly.
Fortunately, a simple workaround is possible: You just have to deactivate multichannel mode on the client Mac, and it works straight away, without restarting.
It’s just creating a file /etc/nsmb.conf :
[default]
mc_on=no
mc_prefer_wired=yes
Or directly

echo ‘[default]’ | sudo tee -a /etc/nsmb.conf
echo ‘mc_on=no’ | sudo tee -a /etc/nsmb.conf
echo ‘mc_prefer_wired=yes’ | sudo tee -a /etc/nsmb.conf
There is a script that does this for you (smb_MC_OFF.sh). We will make it available very soon. For those who do not work wired at all, the last line is not mandatory, but it does not pose a problem in WiFi
In case of problem, just delete the file /etc/nsmb.conf, which does not exist by default.