ATELA’s telephone directory enables all telephone requests for EPFL employees to be processed.
Request a phone numberAll employees with an EPFL employment contract, except Assistant-Doctoral students, Post-Doctoral students, Host Doctoral students and UNIL Doctoral students, automatically receive a personal phone number. As soon as this is ready, they will receive a message in their EPFL mailbox indicating their telephone number and the steps to obtain a softphone or (…)
In order to make an impersonal phone request the user must follow the following steps:go to the atela.epfl.ch siteSearch for the location where the phone should be added via the search barOnce on the room page, click on the button The pop-up below will be displayed.Select New (provided by UC) and then select the desired (…)
In order to change the exit rights of a phone the user must follow the following steps:Go to the atela.epfl.ch websiteGo on the phone’s page by clicking on the phone number, then click on the at the top rightThe following pop-up window opens:Modify the Outgoing right field by selecting the desired right to exit between (…)
Requests without third party validation
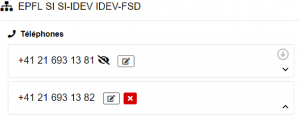
Simply click icon ![]() on the right of the number you want to remove.
on the right of the number you want to remove.
A popup will show to choose approver (if applicable), select an approver and click on Send.
Note: the number isn’t destroyed, this is just the attachment to you user for the given accreditation unit which is.
With you mouse, drag-n-drop the items vertically to put them in the expected order.
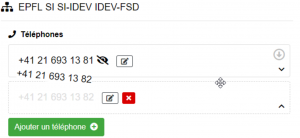
The button ![]() will show, you just have to click it to save modifications.
will show, you just have to click it to save modifications.
Requests which require third party validation
By a person accredited with a Basic ATELA Administrator right.
See the validation process.
Go to your personal page by clicking on ![]() and then on your personal number
and then on your personal number 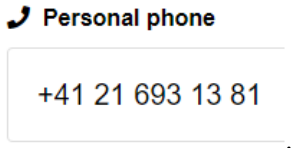 .
.
Once on your personal number page, click on the ![]() icon at the top right. A popup shows :
icon at the top right. A popup shows :

By clicking on ![]() , the impersonation request is created. A popup will show to choose approver (if applicable), select an approver and click on Send.
, the impersonation request is created. A popup will show to choose approver (if applicable), select an approver and click on Send.
Note: This action is only possible if your phone is a landline phone. Otherwise, the icon will not be displayed.
Go on the impersonal number page that you wish to make yours by using the search bar.
Once on the number’s page, click on the ![]() icon at the top right. A popup shows :
icon at the top right. A popup shows :
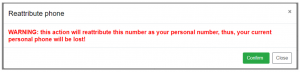
By clicking on ![]() , the reattribution request is created.
, the reattribution request is created.
If you have admin rights in ATELA, you will be able to select to which person this number should be reattributed:
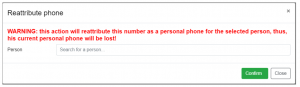
A popup will show to choose approver (if applicable), select an approver and click on Send.
Note: this action is only possible if the phone isn’t linked to any person. Otherwise, the icon ![]() won’t show.
won’t show.
Click on icon ![]() on the right of the number you want to change the type. The phone edition window opens.
on the right of the number you want to change the type. The phone edition window opens.
Update the Type and click on Save.
A popup will show to choose approver (if applicable), select an approver and click on Send.
Note: When softphone type is selected, you cannot associate a room.
This action requires validation of a person with Basic ATELA Administrator when the new type of phone is softphone, and from a person with Advanced ATELA Administrator when phone type is fixed, because
it can involve additional costs.
Go to your personal page by clicking on ![]() and then on your personal number
and then on your personal number ![]() .
.
Once on your personal number page, click on the ![]()
icon at the top right. A popup shows:
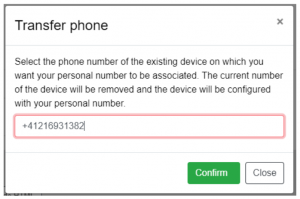
Type the number of the physical device where you would like to transfer your personal number and click on ![]() to create the request.
to create the request.
A popup will show to choose approver (if applicable), select an approver and click on Send.
Note: this action is only possible if your phone is a softphone. Otherwise, the icon won’t show.
This action require validation from a person with Basic ATELA Administrator right.
Search for the room in which the phone you want to updated is located using the search bar. Once you’re on the room page, click on the ![]()
icon of the phone you want to update.A popup will show.

Select the required phone type and click on Save button.
A popup will show to choose approver (if applicable), select an approver and click on Send.
Note: this action is available only for persons with admin rights and only in rooms related to units in which they have this right