The Unified Communications system allow you to access and command your Voicemail from several devices, IP phone, iPad, mobile phone and Jabber softphone.
For the first use, please take a few minutes to configure your Voicemail.
Press the Messages button to reach yourVoicemail.
Type the Personal Identification Code set up by default: 1234 and #.
Press the to return to the Voicemail menu.
Personalize your Voicemail.
Press the Messages button , then follow the voice prompts to record your first name and name as your greetings message.
If you don’t want to record your name press the #. A message by default will be recorded with your name and firstname.
Change your Personal Identification Code.
For the first connection at your Cisco Unity Voicemail, the prompt voice ask you to record your Personal Identification Code.
This personal code includes 4 number and enables secure access to your Voicemail.
Click on the Voicemail icon.
Click on the “Call Voicemail” button.
The Voice mailcall window displays. Click on the Keypad icon to display and access the Voicemail menu.
Follow the voice prompt to record a voicemail greeting, change your Personal Identification Code.
Click on the red phone icon to end call.
From outside…
Check your Cisco Unity Voicemail remotely in calling the +41 21 693 90 90.
From another Cisco IP phone…
You wish to consult your messaging from an IP phone inside EPFL:
Press the Messages button or, press the 3 90 90 or +41 21 693 90 90 button to call the Cisco Unity Voicemail.
Press the Star button.
Type your EPFL fixed phone number at format 41 21 693 01 91(must begin without “0” or “+” by directly with 41 21 69!) and end by #.
Type your PIN code (Cisco Messaging password) and end by #.
Login: type your EPFL credentials. Then, you are in your Voicemail Cisco webpage.
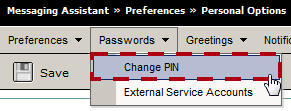
Click on Settings to reach the Voicemail configuration webpage.
Click on Change PIN – Personal Identification Number in the Passwords drop-down list.
Type your new Personal Identification Number, then click on Save.
Here are the quick access keys to different Voicemail Menus :
Call your Voicemail from the message key of your IP phone or form the Call Voicemail key of your softphone Jabber.
Enter your PIN code + #
Choose which Menu do you want by pressing the correspondent number :
Send a message : 2
See older messages : 3
Configuration options : 4
List the teleconferences : 6
Disseminate external messages : 7
Quit :
Help : 0
With the Cisco Unity Connection Voicemail you can save several types of Welcome Messages :
Standard Welcome Message : It is the system default recorded Welcome Message.
Secondary Welcome Message : Allows to record another Welcome Message which can be used occasionally without deleting the standard one.
Closing Welcome Message : Specially designed for calls outside opening hours.
Holiday Welcome Message : Temporary message to activate during your holidays.
Internal Welcome Message : Intended for internal callers.
Busy Welcome Message : Message intended for callers when you are already in communication.
To create a Temporary Secondary Welcome Message (it means with a limited date in time) :
Call your Cisco Unity Connection Voicemail from the Messagekey on your IP phone or by clicking on call the Voicemail from your softphone Jabber.
Enter your PIN Code + #.
Press 4 to access the Configuration Options menu.
Then press 1 to Change the Welcome Message.
Press 1 to record the message in English and 2 to record it in French.
The vocal Guide says “Your current Welcome Message is the Standard Welcome Message”. And offers to :
Press 1 to rerecord your Standard Welcome Message.
Press 2 to activate your Secondary Welcome Message.
Press 3 to modify your others Welcome Messages.
Press 4 to listen to all your Welcome Messages.
Press 0 for Help.
Press to Quit.
Press 2 to activate your Secondary Welcome Message. The vocal Guide offers you to :
Press 1 to specify an end date.
Press # to not specify any end date.
Press 0 for Help.
Press 1 to specify an end date. The vocal Guide offers you to press :
0 to set for Today
1 for Tomorrow
2 for After Tomorrow
And so on
9 to specify a particular end date
Choose 0 to set today (for example). Then the vocal Guide asks you to set an end time to the minute hh:mm + #. If you enter 1600# (for example), the vocal Guide says :
“Your Welcome Message will expire today at 16h00“
“Your Welcome Message is your Secondary Welcome Message“, then you hear the recorded message.
To rerecord your Standard Welcome Message, press 1.
To deactivate it, press 2.
Follow the same procedure to change/record the others Welcome Messages.
From voicemail.epfl.ch/inbox (You need to be connected to the VPN when you are outside of the EPFL)
Select the voicemails that you want deleted and click on the “Delete” button. ( The voicemails are deleted temporarily )
Click on the menu “Deleted” to view the voice messages temporarily deleted.
Select them and click on the button “Empty deleted Items” on the right. A window “popup – Clear All” should display. Click on the button “Yes” to delete all voicemails permanently.
From the softphone Jabber (Mac)
Click the “Voice Messages” button..
Click on the menu “Inbox“.
Select the voice messages to delete.
Click on the menu “Trash“.
Select the voice messages that you deleted previously and click on the right button of the mouse.
Click on “Empty Voicemail Trash…” from the context menu.
From the softphone Jabber (Windows)
Click the “Voice Messages” button.
Check if the values of the options “View” and “Type” are to All.
Select the voice messages to delete and press on the “Delete” key of the keyboard.
Select the value “Deleted” in the “Type” option.
Select the voice messages that you deleted previously and press on the “Delete” key of the keyboard.
Click on the button “Yes” from the context menu.
Error message : “Access to the requested resource has been denied”.
Workaround : Clear Browser Cookies and Caches and open fresh browser.