Guidelines for the observation of a COSMOGRAIL target
This page summarises operations and software settings that are required to observe in the best possible way the lensed quasars of the COSMOGRAIL program.
- Observationnal Requirements
- Checklist
- Telescope Control System
- Focus & collimation
- Guiding
- Data acquisition
Observationnal Requirements
We do not require to observe during dark time or in particularly good seeing condition but please make sure that your observation match the following requirements :
- Daily observations (24 min exposure + overheads)
- Seeing <1.8” (but we still need the best possible focus)
- Airmass < 1.5. Please check the visibility plots.
- No moon separation requirements.
Checklist
Here is the summary of the task you will need to perform daily but please also read the rest of the instructions for more details :
- Take 4 exposures of 360 seconds in R filter every night. The coordinates where to point the telescope are :
(RA 06:59:04.07, DEC:+16:31:09.2)
The target should be on the detector corresponding to the second extension of the fit files (i.e. <image>.fits[2], which corresponds to the lower part of the detector when North is up and East is left). - Please take 5 bias exposures and 5 flats exposures in R filter with 1:1 binning every day, even if you cannot observe.
- Make sure that the telescope is in focus.
- Make sure that all science and calibration frames are saved to the COSMOGRAIL directory :
/mnt/TBArray/images/cosmograil/
The fits files are automatically sorted by date every morning. - Fill the night report everyday, even if you did not observe.
Telescope Control System
On the “TCS” screen.
Point to the mag 3.58 star Gem lambda 54 (RA 7:18:05 DEC +16:32:24). A convenient way is to use “Telescope Go To” on Xephem. Gem lambda 54 is bright enough to be unmistakable for a new “Init. Coords.” (TCS-Glue; this will improve tracking on the QSO).
Then right click on the coordinates fields (e.g. on Telescope Right Ascension), then enter corresponding RA and DEC of the target and press “GoTo” in the TCS-Glue.
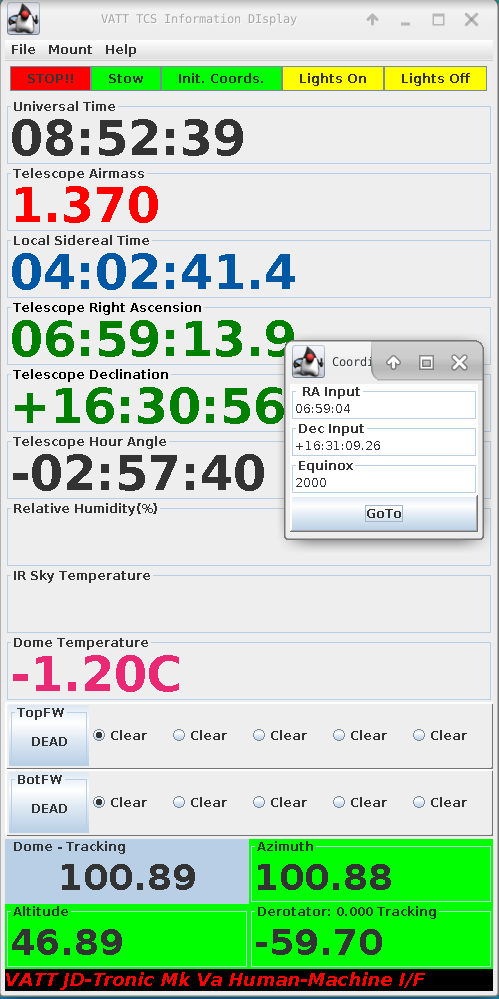
Make sure that the target is located on the lower part of the CCD which corresponds to the second of the fits file : <image>.fits[2]. If not, please adjust the coordinate until this is the case. To locate the target more precisely, you can use the Finding Charts. Remember that before inspecting the images with ds9, you need to Zoom > Invert Y in DS9 in order to have the North on top and the East to the left.
Focus and Collimation
On the “Guiding/focus” screen.
Please try to set the focus and collimation the best you can. You can use the the stars circled on the Finding Charts to make the focus.
These lensed quasars are observed daily to extract precise photometric variations out of the multiply imaged point source. These multiple images are typically separated by ~1” so this is really crucial for us that you make sure that the telescope is in the best possible focus and that the PSF is limited by the seeing. The images will be deconvolved anyway but it is always easier with good seeing.
Thank you in advance for the great focus !
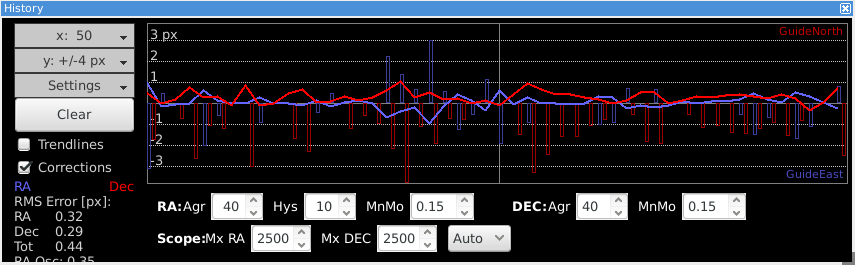
Guiding
On the “Guiding/focus” screen.
Because of long exposure times, guiding is mandatory for COSMOGRAIL targets. Please ensure that the guiding is running correctly before starting the sequence of exposures.
While the guiding is running, the interface of the guiding software should look like the example below.
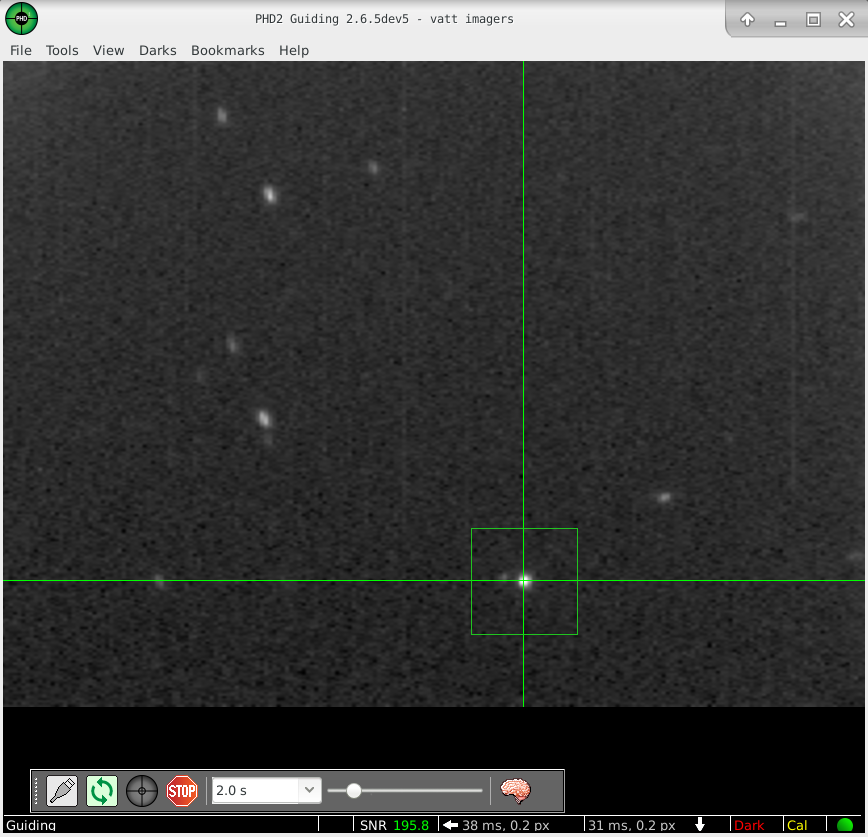
You may find a suitable guide star on the U mirror at X=+30, Y=+55 (appropriate focus is approx. +20). The History panel, like the one below, can also be used to check if guiding is well constrained.
Data acquisition : AzCam software
On the “CCD” screen.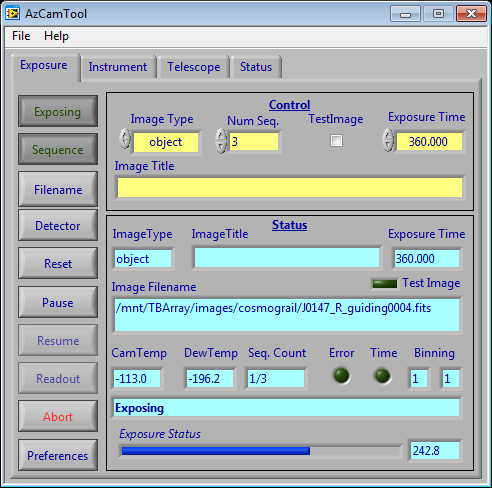
- Click on the Filename button in the left panel, and enter the path to the COSMOGRAIL directory :
/mnt/TBArray/images/cosmograil/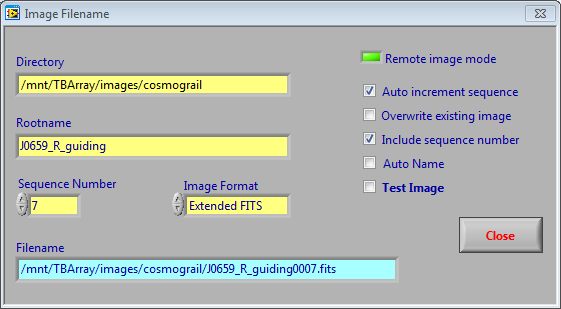
Enter also a name for the file in the Rootname field, that is containing the target name and the filter. You will observe in R filter so please enter J0659_R in the Rootname field. The Sequence Number should normally be 0 or 1 at the beginning, and if Auto increment is checked, it will be updated for each image in the sequence.
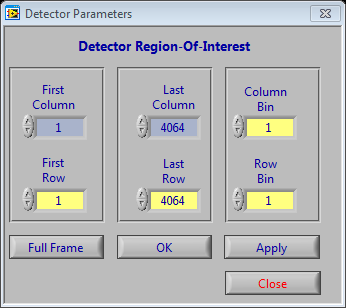
Validate the changes. - Click on the Detector button. Make sure that the CCD binning is 1:1 (1 for column and 1 for Row Bin and Column Bin at 1).
-
Select the right Image Type : flat (flat fields), zero (bias), dark, or object for the actual science exposure.
- In the field Num Seq. insert 4 as the number of exposure per sequence.
- Set the Exposure Time to 360.000 seconds.
- Check that you have entered J0659_R in the Rootname field.
- Once everything is set up correctly, and guiding is running, click on Sequence (not Exposing) in the left panel. This will automatically launch all the exposures one after the other. Please delete tests and failed exposures from the COSMOGRAIL folder.
In case of issues with AzCam, the software instructions can be found ont the official AzCam website.
Dome flats
- Please take 5 dome flats everyday. Detailed instructions are at https://lavinia.as.arizona.edu/~tscopewiki/doku.php?id=vatt:dome_flats
- Use the following parameters for your dome flat aquisition : White = 50%, Amber = 100%, Incandescent = 50%, all other sources off, including the dome floodlight and other ambient light.
- Use the R filter, 1×1 (unbinned), and 8s exposure time.
- Save your dome flats into the COSMOGRAIL folder : /mnt/TBArray/images/cosmograil/
under the same flat_R_XX.fits