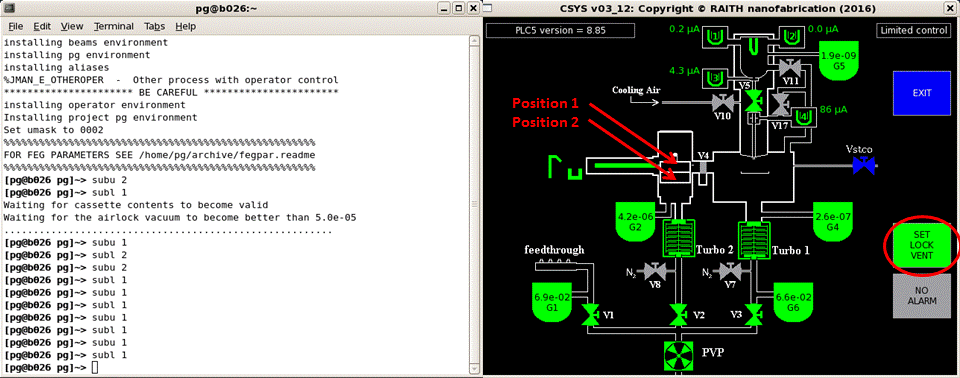
Loading and unloading of the holders is performed in the PLC- Load/Unload workspace of the control computer. To vent or pump the loadlock use the “SET LOCK VENT” button in the CSYS window, see more details below.
If the holder is already in the loadlock or on the stage of the tool use the terminal window to issue the load and unload commands to move the holder between the stage and the loadlock cassette. The commands are subl X or subu X where subl = substrate load from loadlock to the stage, subu = substrate unload from the stage into the loadlock and X = the slot position you wish to perform the action on, e.g. subl 1 = substrate load from slot 1, subu 2 = substrate unload to slot 2. ALWAYS WAIT FOR THE PROMT TO RETURN BEFORE CONTINUING.
Unloading

Click the “SET LOCK VENT” button in the CSYS window. Wait about 1 minute for the loadlock to vent. There is a small red LED light on the sensor attached to the green nitrogen pipe used to vent the loadlock – it is lit when the loadlock is being vented and it turns itself off when the process completes. You will not be able to open the loadlock until this light is off.
When the loadlock is fully vented, open the lid. Tilt the holder cassette slightly as you take it out to avoid the edge of the holder hitting the side of the loadlock. Place the cassette on the surface in front of the loadlock. Slide the holder out of the cassette. Be careful not to touch the calibration block or the sapphire pins at the bottom and on the front side of the holder. Place the cassette back into the loadlock. Close the loadlock lid and pump out the airlock by selecting “SET LOCK VACUUM” in the CSYS screen of the control computer.
Loading

Click the “SET LOCK VENT” button in the CSYS window. Wait about 1 minute for the loadlock to vent. There is a small red LED light on the sensor attached to the green nitrogen pipe used to vent the loadlock – it is lit when the loadlock is being vented and it turns itself off when the process completes. You will not be able to open the loadlock until this light is off.
When the loadlock is fully vented, open the lid. Tilt the holder cassette slightly as you take it out to avoid the edge of the holder hitting the side of the loadlock. Place the cassette on the surface in front of the loadlock. Gently insert the holder into the top or bottom slot (your choice) of the cassette. Both the upper and lower slots of the cassette can be loaded in the same way. Engage the side of the holder nearest you in the cassette, then rotate the holder so that the other side slides correctly into position. The holder can then easily be pushed into the cassette. Avoid touching any of the sapphire pins at the bottom and on the front side of the holder while pushing the holder. You MUST make sure that the holder is inserted correctly. FAILURE TO DO THIS PROPERLY CAN CAUSE SERIOUS DAMAGE TO THE MACHINE. Place the cassete back into the loadlock. Tilt the cassette as it goes in. Make sure the cassette is securely in position. Close the loadlock lid and pump out the airlock by selecting “SET LOCK VACUUM” in the CSYS screen of the control computer. Wait until the vacuum in the loadlock reaches 5.0e-05 and the G2 pressure indicator turns green before you start issuing subl or subu commands.