Preliminary and fundamental remarks:
- SAFETY OPERATOR MANUAL TO OPERATE ON CMi WETBENCHES (HERE)
- Metals are strictly forbidden in Piranha baths. Some exceptions are possible but require CMi agreement.
UFT Piranha in zone 2 is dedicated to clearing residues of organics only. It is NOT aimed at clearing full layers of organics and/or layers of metallics.
For organics, UFT Resist bench must be used.
For metallics, Arias Acid bench must be used.
Piranha cleaning is achieved through two identical and successive baths of concentrated sulfuric acid (H2SO4 96%) heated at 100°C and activated by hydrogen peroxide (H2O2 30%).
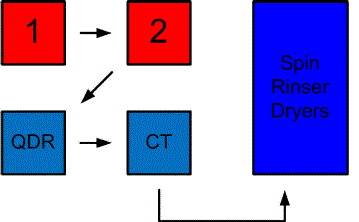
CT: Cascade Tank (fine rinsing)
Figure 1: Schematic of the UFT Piranha treatment route
Step-by-step procedure
This bath is filled with sulfuric acid. No substrate with layers of metallics is allowed, unless agreed with CMi Staff.
- Activate the heating system of baths 1 and 2 filled with H2SO4 (it takes > 30min to rise up to 100°C from room temperature).
- Load the wafers in one of the H2SO4 dedicated Teflon carrier and put the handle on.
- Fetch the hydrogen peroxide (H2O2) bottle in the chemical cabinet.
- Full protection is now required (nitrile gloves + chemical gloves, apron, face shield) before going further.
- Once the temperature (100°C) is reached, measure 200ml of H2O2 in the dedicated Teflon column and gently pour the 200ml H2O2 into the first bath filled with H2SO4.
- Do the same for the second bath filled with H2SO4.
- Gently plunge the carrier into the first bath filled with H2SO4 and close the lid.
- Start the timer by using the button “Timer 1”. Don’t change the duration of the timer!
- Rinse the chemical gloves!
- Rinse the Teflon column 3 times.
- After 5 min, a buzzer indicates the end of the first treatment. Press the button “Alarm Silence” to stop it and to reset the timer.
- Move the carrier to the second bath and close lids.
- Start the timer by using the button “Timer 2”. Don’t change the duration of the timer!
- After 5 min, another buzzer indicates the end of the second treatment. Press again the button “Alarm Silence” to stop it and to reset the timer.
- Move the carrier to the QDR bath and close lids.
- Press the button “QDR” to start the first rinsing cycle. At the end of it, press “Alarm Silence” to stop the buzzer.
- Move the carrier to the Cascade bath and close lids.
- Press the button “CASCADE” to start the second rinsing cycle. At the end of it, press “Alarm Silence” to stop the buzzer.
- Clean all surfaces of the wet bench with a moist tissue (3 x cleaning/rinsings are necessary).
- Remove the handle and put the carrier in the spin rinser and dryer SRD by using the recipe “Dry only”. Just press STOP and the START.
- Dry the entire wet bench with absorbent papers.
- Stop the heating system of baths 1 and 2.
- When the SRD is finished, get the wafers back and put the carrier where it belongs.
- Carefully check the cleanliness of the wet bench before taking off nitrile gloves.
- Perform wet bench logout on zone 2 computer.
- Bring back the H2O2 bottle or follow the “Empty bottle” procedure!
Any droplets of any kind MUST be removed from the wetbench before leaving it. Suspicious droplets must be cleared using a moist cloth (2 to 3 cleanings/rinsings are necessary) and remaining water droplets must be removed with absorbent paper.