Please do mind cross-contamination:
No black boxes when working with PDMS.
Dedicated blue boxes are available on request.
Transparent boxes (petri dish, wafer boxes) are allowed as long as dedicated to PDMS.
Contents
- Material requirements
- Typical process flow
- Surface conditioning
- Mixing – Degassing
- Pouring – Spin coating
- Baking – Curing
- Alignment – Demolding – Access ports by punching
- Surface activation for bonding
I. Material requirements
Handling. Safety glasses, gloves, tweezers, Petri dishes, pipettes, spoons, cups, razor blades, scalpels, aluminum foil.
Machines. Ventilated fume hood, high precision scale, mechanical mixer, vacuum desiccators, spin coater, manual hole-punching machine, binocular, oven/hot plate, oxygen plasma.
Products. Sylgard 184 silicone base, Sylgard curing agent, silanizing agent (TMCS: Chlorotrimethylsilane, 33014 from sigma).
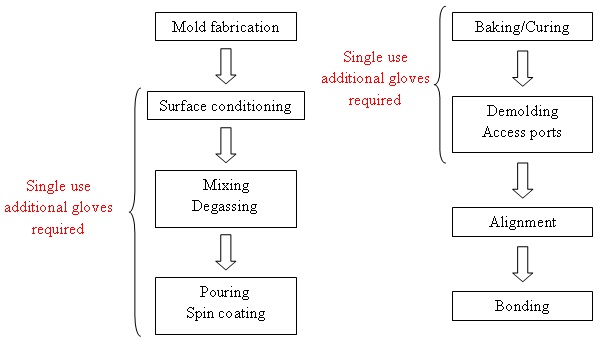
II. Typical process flow
The first step in PDMS molding is designing molds and creating them. SU-8 processing and silicon etching are the two protocols commonly used to realize molds for PDMS micro-molding. Procedures for creating these molds are not presented in this present document.
III. Surface conditioning
-
Put on single use additional gloves and operate only under the fume hood
- Fetch TMCS in the “solvent” cabinet located on the right side of the wet bench
- Place a few drops of TMCS in the small glass receptacle located in the TMCS desiccator (single use pipettes are available for that purpose)
- Remove any dust on the surface of the mold using a nitrogen gun
- Place the silicon/SU8 mold in this very same desiccator
- Close the desiccator and place it under vacuum (this causes the TMCS to evaporate and to form a passivation layer on the mold surface)
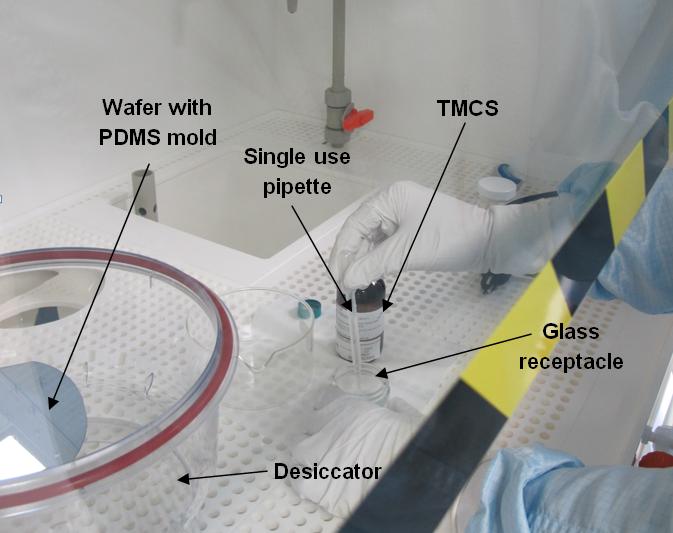
- Close well the TMCS bottle (use tape also). Fill-in the “chemicals follow-up” document
- When desired time is reached, vent the desiccator. DO NOT breath directly above the open desiccator
- Take your mold back. Bring TMCS bottle back in the “solvent” cabinet
See here a summary about surface contact angle tests on TMCS surface treatment of a silicon wafer.
IV. Mixing – degassing
A single use plastic cup is to be used for preparing the PDMS mixture. The plastic cups are compatible with the mechanical mixer and their maximum capacity is 50g. This means the total mixture must weigh 50g maximum.
Details about PDMS dispenser available HERE.
- Put an empty and clean single use plastic cup on the precision scale
- Tare the scale so it displays 0
- Press once the left pedal to get a fixed dose of cross-linker (1g). When the supply of 1g is complete, press once again for an additional 1g. Do this until you get the needed amount
- Tare the scale so it displays 0
- Use the other pedal to dispense continuously the correct amount of base PDMS in order to reach the wanted ratio
- Place the cup in the mixing machine and adjust the revolution balance dial according to the total weight of the cup
Caution: adapter weight of 115g to be added to the weight of your cup
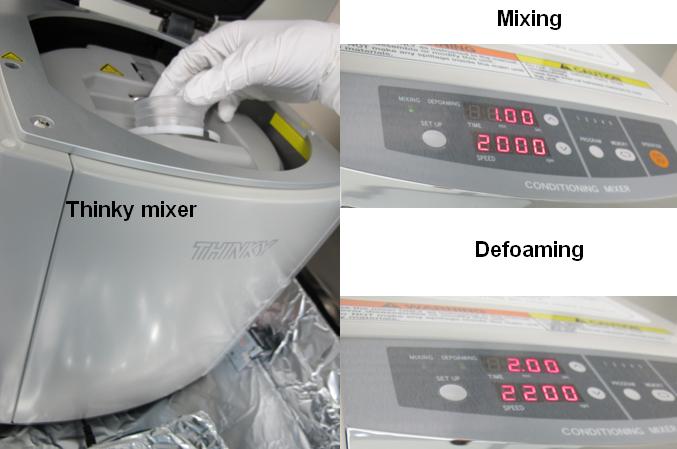
- Use the mechanical mixer to correctly homogenize the mixture (Program 1)
-
-
-
-
- Mixing: 1min @ 2000rpm
- Defoaming:2min @ 2200rpm
-
-
-
Clean well the scale before switching it off and clean the products bottles
- Final degassing is to be performed in the desiccator.
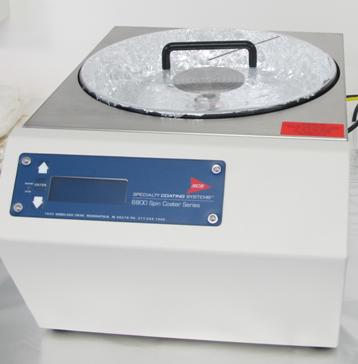
V. Pouring – Spin coating
Pouring
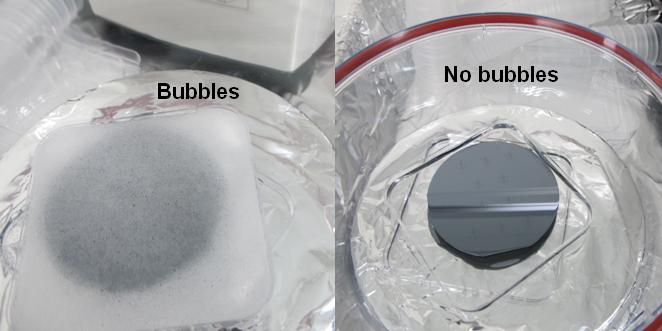
Pour the PDMS mixture over the passivated mold placed in a Petri dish. The interior of that dish should be protected with aluminum foil. Be careful not to create bubbles while pouring the mixture (proceed slowly). The mixture is then degassed in the desiccator to remove any remaining entrapped bubbles. If large bubbles form at the surface, vent vacuum slowly so the mixture does not foam out. Put it back under vacuum until no bubbles are visible. This also improves the filling of small structures.
Spin coating
Programming instructions are available HERE.
After spin-coating, it is essential to leave the substrate at atmospheric pressure for ~15min to homogenize the thickness on the edges. Also, an additional degassing step in the desiccator may help removing remaining entrapped air.
A spin curve of a 10:1 ratio spun onto silicon wafers is available HERE.
It is suggested not to operate the spinner over 6000rpm. Chucks for 4″ wafers, microscope slides and 1x1cm samples are available.
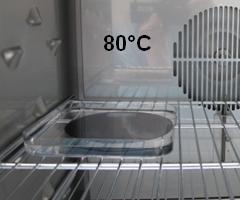
VI. Baking – Curing
PDMS can cure without heating in ~24 hours. To decrease cure time, put the Petri dish in an oven for at least 2 hours at ~80°C. Curing time depends on temperature and on the thickness of PDMS. After curing, the wafer is stable and can be stored for months if necessary.
VII. Alignment – Demolding – Access ports by punching
After cooling, the PDMS is easily peeled off and cut. Use adequate tools to perform it (tweezers, razor blades…). Cut the PDMS into the desired shape.
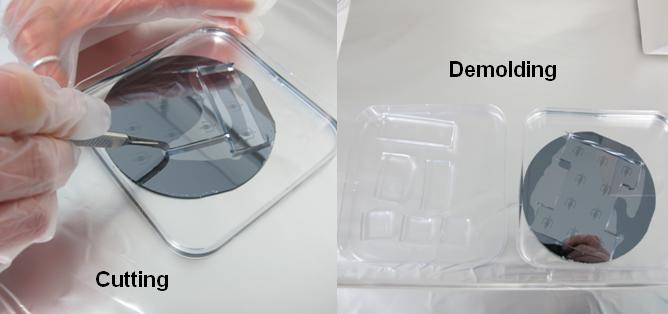
Create access ports using the manual hole-punching machine fitted with a light source and a video camera. Alignment of PDMS samples with other glass/PDMS/silicon pieces can be done using the binocular.
CMi does NOT supply the punch bits to be used with the hole-punching machine (too many possible references, shapes and sizes). Please refer to following supplier:
https://www.syneoco.com/mp-and-md-series/
https://www.syneoco.com/catheter-punches/
VIII. Surface activation for bonding
PDMS can be bonded to glass, silicon and itself using oxygen plasma surface activation. PDMS is hydrophobic, with a low energy and non reactive surface. It is therefore difficult to bond it with other surfaces. By exposing PDMS to oxygen plasma, its surface becomes hydrophilic and more reactive. This results in irreversible bonding when it contacts glass, silicon, or even another PDMS piece that was exposed to the same oxygen plasma. Contact should be made quickly after plasma exposition because the PDMS surface will undergo reconstitution to its hydrophobic and non reactive state within hours. The bonding is accelerated if a post-bake is then performed.
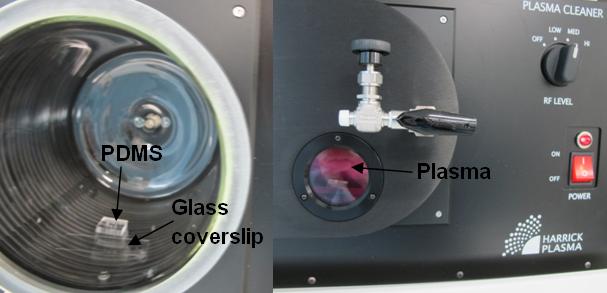
A fine tuning of the oxygen plasma is necessary:
- A too long exposure will create too many Si-OH sites resulting in a non-sticking silica layer
- A too short exposure will not create enough Si-OH sites for good bonding