


To be read first:
- This tool is not MICRO-ELECTRONIC compatible
- Photoresist, kapton, parylen or polyimide (and all organic layers from a general point of view) are accepted after an extended training (Please contact CMI staff).
- Copper or gold are accepted after an extended training (Please contact CMI staff).
- Maximum process duration vs. process temperature :
Process Temperature [°C] 500 600 700 800 900 1000 1100 Maximum process duration [min] 240 180 150 120 60 15 9 Maximum process duration [h] 4 3 2.5 2 1 0.25 0.15
RESERVATIONS RULES AND BILLING POLICY :
- Booking : No restriction
- Reservtion names must be correspond to operators
- Billing : Processing time
- No penalty fees in case of user’s no show
CONTENTS :
-
- Wafers and/or samples
- Temperature monitoring
- Thermocouple positioning and thermocouple withdrawal
V. Links
I. Equipement description
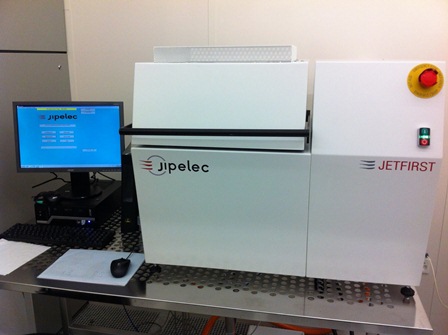
The JetFirst 200 system is a bench top RTP (Rapid Thermal Process) tool. It is dedicated to the following applications or processes:
- RTA: Rapid Thermal Annealing for silicon or semiconductors compounds wafers (Nitrogen and Forming gas lines).
- N.B. : Forming gas = 5% H2 in N2
- RTO: Rapid Thermal Oxidation (Oxygen line).
- RTN: Rapid Thermal Nitridation (Ammonia line).
- RTD: Rapid Thermal Diffusion for spin-on dopant (Nitrogen line).
- Crystallization (Nitrogen line).
- Contact Alloying (Nitrogen and Forming gas lines).
- Solar applications for PV industry (Nitrogen line).
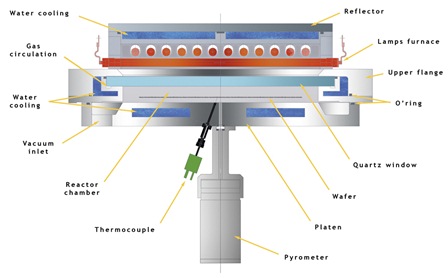
The tool is equiped with :
- A process chamber in stainless steel (see gallery above)
- A furnace part with 24 tubular infrared lamps.
- 4 gas lines (O2, N2, NH3 and Forming gas).
- A primary pump.
- A turbo pump.
The equipment is driven by a software interface (PIMS) but the following manual operations are requested:
- Sample loading/unloading.
- Recipe selection and downloading.
- PID selection and downloading.
- Temperature sensor selection and setting up.
Your personal environment with your recipes, the PID tables associated and the historicals are stored in the directory of your laboratory under the following path:
Qualiflow Therm \ user_lab \ your_lab \ your_name
II. Configuration of the tool
-
Wafers and/or samples
The system is compatible with wafers from 2” up to 8” as well as pieces of wafers. Whatever the sample you process, it should never be placed directly on the metallic floor of the RTP chamber!
For each size of wafer (4”, 6” and 8”) and for dies, we have a set of picots in quartz. Each picot has to be placed in their dedicated holes (depending of the size of the wafer) in the floor of the chamber.


Transparent samples compatible (quartz or sapphire) with high temperature treatments (above 1000 °C) have to be place in the SiC susceptor. The susceptor corresponds to a 6” wafer; it can accept 4” wafers or smaller sizes. It can be used with or without cap. At last, the TC has to be placed in its dedicated hole in the susceptor. The suceptor is available on demand (Please contact CMi staff).
-
Temperature monitoring
The tool is equipped with 2 complementary systems to set, control and monitor the temperature: 3 thermocouples (one for the regulation, TC1, and two for the monitoring, TC2 and TC3) and one pyrometer. The selection of the monitoring system is done in the recipe for each step.
Thermocouple regulation
The regulation by thermocouple is the default temperature monitoring mode. The TC regulation is effective from the room temperature up to 1000 °C under atmosphere and up to 800 °C under vacuum. Outside of these ranges of temperature or pressure, a regulation with pyrometer has to be used and the thermocouple has to be withdrawn from the process chamber and move in the floor of the chamber !!
The TC regulation is valuable for all types of substrates (Si, glass, quartz, susceptor, sapphire…). The TC is in contact with the back side of silicon substrate or the susceptor. A clean back side is mandatory to ensure a good contact between the TC and the wafer and consequently a good reading of the temperature. It’s strongly recommended to clean the samples with a RCA cleaning or with a Pirhana cleaning if possible.
Pyrometer regulation
The regulation by pyrometer is done by the conversion of the infrared radiation emitted by the substrate into temperature. This conversion implies the creation of a conversion table (calibration table) which was done during the installation of the tool. The emissivity is dependent on the wafer itself and the layers that you have on it. A dedicated table could be necessary; in this case a test wafer with the same characteristics of the product wafer is needed.
The regulation with pyrometer is effective from 500 °C up to 1200 °C in atmosphere and up to 1100 °C under vacuum. Below 500deg, the thermocouple regulation has to be used!
The pyrometer regulation is not possible for transparent substrates like glass, quartz, sapphire… All the transparent samples have to be placed in a graphite/SiC susceptor.
-
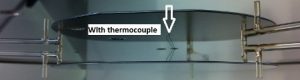
Thermocouple positioning and thermocouple withdrawal
As previously mentioned :
- TC cannot support temperature above 1000 °C at atmospheric pressure.
- TC cannot support temperature above 800 °C under vacuum.
In both cases, the TC has to be withdrawn from the RTP chamber and move in the metallic floor of the chamber. To withdraw the TC, you have to unscrew the nut in order to move the connector down (between 5 to 9 mm) and hide it in the metallic floor of the chamber. The TC should not anymore be visible.
TC in contact with the wafer
TC in the floor – no visible
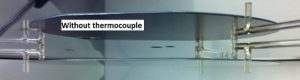
| Nut screwed – TC upper position | Nut unscrewed – TC down position |
 |
 |
III. How to create a recipe
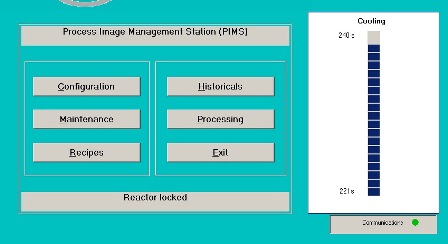
To have access to edition mode, first you open the home page of PIMS interface by clicking on the shortcut JetFirst. After login in engineering mode (Password on the screen), you select the menu Recipe. The editor is open and can follow the step by step procedure entitled How to create a recipe to fill the requested parameters for each step of your recipe.
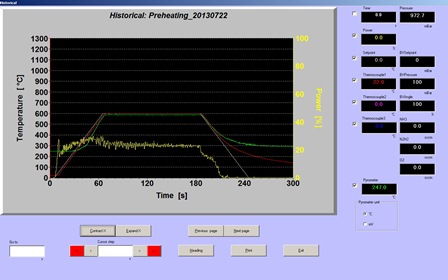
A typical RTP recipe with a thermocouple regulation is composed of a minimum of 5 steps. An example is available in the directory user_examples.
Qualiflow Therm \ user_lab \ user_examples \ 600C_TC
A typical RTP recipe with a pyrometer regulation is composed of a minimum of 10 steps with 5 steps dedicated to the activation of the pyrometer before the ramp up step. An example is available in the directory user_exemples.
Qualiflow Therm \ user_lab \ User_examples \ 1000C_Pyro
A step by step procedure is available in section 2.3 in the pdf document below:
IV. How to use the system
A step by step procedure is available in the pdf document below:
- How To Use The System (RTP) : Short version
- How To Use The System (RTP) : Extended version including recipe creation and run monitoring