Download, unzip and copy the folder centrioleJ to the plugins folder of ImageJ (e.g. on a Mac, /Applications/ImageJ/plugins/). Please do not delete the folder “tmp_DO_NOT_DELETE”. In the examples folder, you will find two folders. Each one contains a source image and its processing by CentrioleJ (see user guide below for details on each file).
Note that CentrioleJ also requires that you have the plugin UnwarpJ installed. You can find it here.
User guide
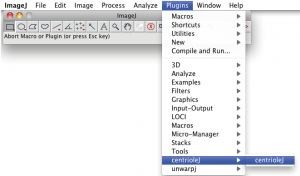
Start CentrioleJ by selecting Plugins > centrioleJ > centrioleJ
Select the image to be analyzed and specify the options in the dialog box that appears:
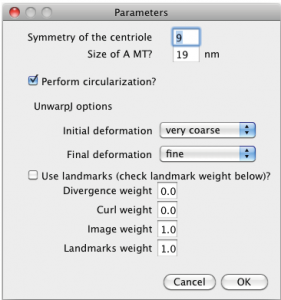
- Symmetry of the centriole: specify the presumed symmetry of the centriole
- Size of a microtubule: this will be used to draw the scale bar in the end
- Perform circularization: check the box if you want to perform circularization
UnwarpJ options (see also http://bigwww.epfl.ch/thevenaz/UnwarpJ/):
- The “initial” and “final” deformation lists allow you to select the coarsest and finest scale of the spline deformation field [1].
- Use landmarks: check the box if you want to use landmarks (e.g. all the microtubules center) [1].
- The different weights control the relative weight of each one of the terms in the energy function [1].
If you have checked the box “Perform circularization”, you will be asked to draw a polygon passing through all the A microtubules:
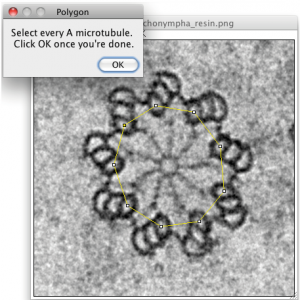
Click OK once you are done. CentrioleJ now shows the circularized centriole and asks you to define the region of interest in the image:
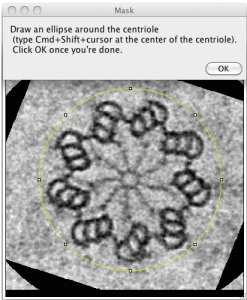
This image is saved as figure-name_CIRC-1_reference.tif (where figure-name is the name of your figure). If you want to perform new analyses on the circularized centriole later on, e.g. changing UnwarpJ options, centrioleJ will automatically load this figure for you, so you don’t need to draw the polygon again. Hence, you should delete this file in the case where you would like to define a new polygon to be used for circularization. CentrioleJ also writes a file called figure-name_circularization_x_y_angle.txt with the scaling factors along x and y that were used, as well as the rotation angle.
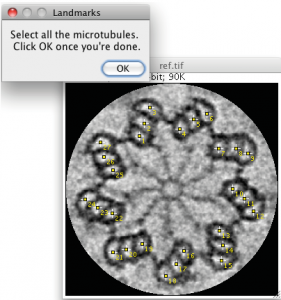
If you checked the box “Use landmarks”, you will be asked to click on all the microtubules. Click OK once you are done. The landmarks are saved in the file figure-name_landmarks.txt. Next time you use CentrioleJ with this image and check the box “Use landmarks”, they will be automatically loaded. You can modify them and click OK once you’re done.
After circularization and landmarks selection, CentrioleJ calls UnwarpJ several times, depending on the presumed symmetry. Please wait until UnwarpJ is finished (generally less than a minute).
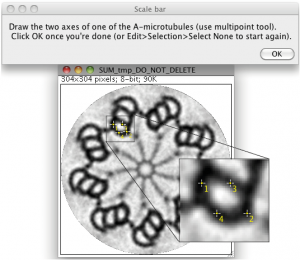
The scale-bar is based on the size of a microtubule (“size of A MT”, defined in the first dialog box). You should draw two axes of a microtubule and click OK (important: make sure to click in the order shown below). CentrioleJ will average the microtubule diameters given by dist(1,2) and dist(3,4) and set this length to “size of A MT”. The scale bar is set to 10nm.
The final image with scale bar is saved as figure-name_CIRC-1/0_UNWJ-options_cJ.tif. If you checked “Perform circularization” in the initial dialog box, the file name will contain CIRC-1; otherwise, it will contain CIRC-0. UNWJ-options are the options specified for UnwarpJ.
initial_deformation–final_deformation–divergence_weigth–curl_weight–image_weight–LM–1/0–landmarks_weight
LM stands for landmarks. If you used landmarks, the filename will contain LM-1; otherwise, it will contain LM-0.
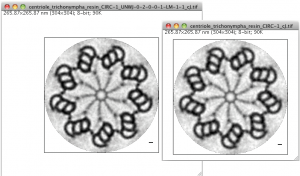
Note that CentrioleJ also saves the figure that is symmetrised without re-aligning the figures with UnwarpJ (figure-name_CIRC-1/0_cJ.tif). Below, you see on the left the circularized centriole re-aligned with UnwarpJ using landmarks; on the right, the circularized centriole without UnwarpJ processing (watch the file names; in this example, the initial figure name was centriole_trichonympa_resin.png; please avoid dots in your figure names, except for the file extension).