Using interactive tools in class
Teaching with interactive tools
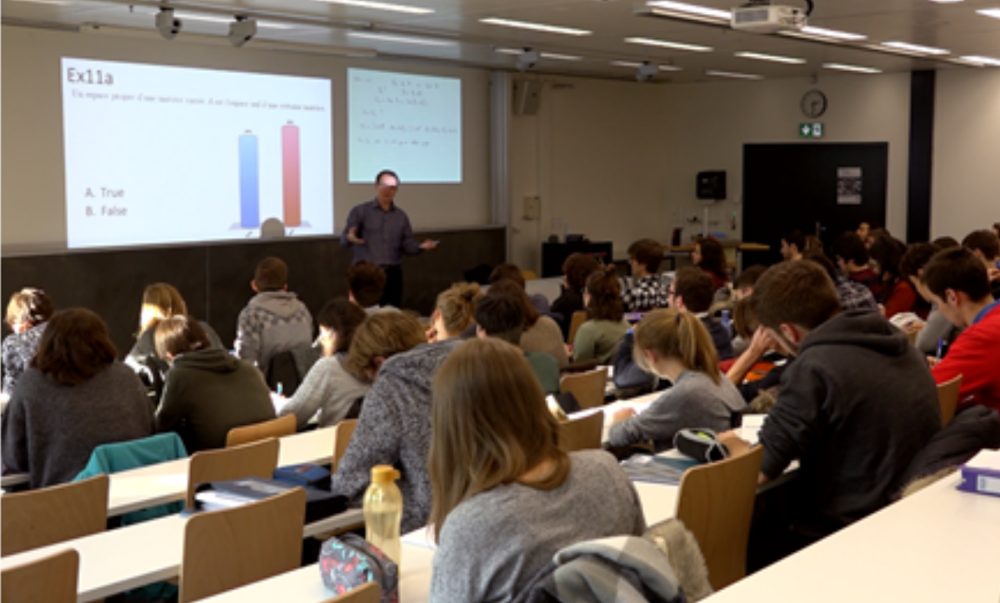
EPFL uses the EchoPoll Student Response System to encourage students to participate in class by allowing them to submit responses to interactive questions. Student can submit answers with a connected device (smartphone, laptop…).
Here you can find an example of Professor Eric Mazur using online polling.
Student Response Systems can:
- Increase interactivity and participation in class, and therefore improve students’ attendance;
- Make students more active during lectures;
- Allow students to get feedback on their learning;
- And allow you to get feedback on your teaching.
These benefits are maximised for lectures with a large audience.
Other strategies can also be used as a complement to (or instead of) electronic devices to make students active in the classroom.
What do I need?
The EchoPoll Student Response System can be used in the following ways:
- In a web browser (e.g. Safari, Google Chrome, Firefox)
- Integrated with PowerPoint (on Windows or macOS)
To create polls and collect students’ responses on your computer, you will need:
- Access to the EPFL licence to use the software
- An EchoPoll account
- The EchoPoll plug-in installed on your computer if you use EchoPoll with PowerPoint (option (2) above)
To get access to the licence, please contact Iris Capdevila or Stanislas Herscovich. You will then receive the information needed to create an account and install the appropriate software.
You will find the key information to create your EchoPoll account and take your first steps with EchoPoll
- in this tutorial (~14’), if you use EchoPoll in a web browser
- in these tutorial 1 (~5’) and tutorial 2 (~9’), if you use EchoPoll integrated with PowerPoint on Windows
- in these tutorial 1 (~5’) and tutorial 2 (~8’), if you use EchoPoll integrated with PowerPoint on macOS
What do my students need?
Students will need a connected device (smartphone, tablet, laptop) to respond to poll questions.
Students will connect to your class via the website echo360poll.eu (using a code that you provide) or via a QR code generated by the software. They can then respond to questions whenever you make them available.
How do I get started?
EchoPoll provides a number of resources to help you get started.
- General product page with a short demo (in English)
- More detailed documentation and articles (in English)
Setting up your account
For data protection reasons, it is important to note that when we ask students to go to the site echo360poll.eu (via QR code or in a browser), they should not register, but only use the website in guest mode, without providing any identifying information.
After logging in through the EchoPoll website, go to the “Open” option in the “EchoPoll” box, then click on your avatar in the upper-right corner, then “Account settings” and then “Preferences”. Please check that the options under “Default participation settings” are as below (choose “Guests (public)” for the field “Join mode” and “Hidden” for the three fields “First Name”, “Last Name” and “Email”).

Your sessions will then, by default, be configured not to request any information from your students. They will be able to connect easily without providing identification.
Informing your students
For data protection reasons, you need to provide students with information about how their responses are processed. You can find the required legal information here [legal information]. A slide you can use in class is provided here [slide]. (A VPN connection is required if you are off-campus.)
We offer individual support covering both technical and pedagogical aspects of teaching with clickers. Don’t hesitate to contact Iris Capdevila ou Stanislas Herscovich for personalized advice.
The dates of the next workshops offered by the Teaching Support Center can be found here.
If it is the first time you are using a Student Response System, we suggest you to ask for personalized support or to register for our “hands on” workshop on Online Polling. More information here.
Preparing your course
1. Prepare your questions
- Focus your questions on concepts that are important or particularly difficult for students to understand (remember that interactive activities take time, so you will need to reorganise the timing of your lectures)
- Use simple question types such as multiple-choice so that students can focus on the content of your questions, not on their form
- Choose carefully the wording of your questions and of the proposed answers
For each question, we suggest checking the following points:
Why ask this question?
- What is the purpose of asking this question?
- Is this question addressing one of the learning objectives of your course?
- Can this question be considered as a learning activity (a kind of exercise, problem, debate…) that complements your lecture?
What do you ask?
- Does this question help to clarify/apply/deepen a fundamental concept of the course?
- Does this question challenge students on their common difficulties, misconceptions, assumptions or preconceptions?
- What do you expect students to do when they think about this question: remember, apply, compare, analyse…?
How do you ask?
- Is the question clear?
- Is it a well-structured question (direct, focused…)?
- Are the proposed answers plausible?
- Can you (and your students) easily interpret the results of the vote?
When do you ask?
- At what point in your lecture will you ask this question?
- How much time do you plan to allocate to it?
- How will you use the results of the vote (to adapt the content of your lecture, start a discussion, introduce an experiment…)?
2. Re-think the structure of your course
- More interactivity = less lecturing! A typical one-hour lecture can include 3 to 4 questions. You can also structure a lecture that evolves around interaction with the support of electronic polling.
- Choose the key moments at which you will ask a question depending on your goal
(e.g. assess prior knowledge, assess understanding, detect misconception, apply knowledge, relate to other concepts…)
3. Prepare to interact with students around your questions
- Prepare yourself to react to students’ responses – first because you can get unexpected results, but even when all students have the right answer, it is important to debrief it with them (even very shortly) because they may have chosen the right answer for the wrong reasons…
- Use the results of the vote in your lecture, e.g. to introduce your next lecture part, to start a debate, to adapt the plan of your lesson, etc.
- Use an interaction strategy to maximise students’ participation (see “Teach effectively with Student Response Systems – interaction strategies” below).
Teach effectively with Student Response Systems
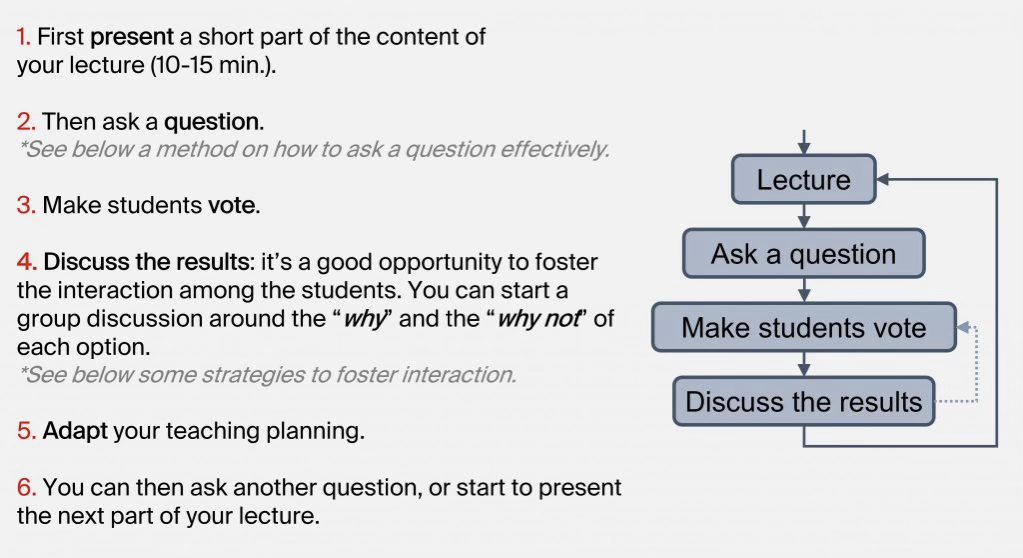
A lecture using a Student Response System generally follows this pattern:
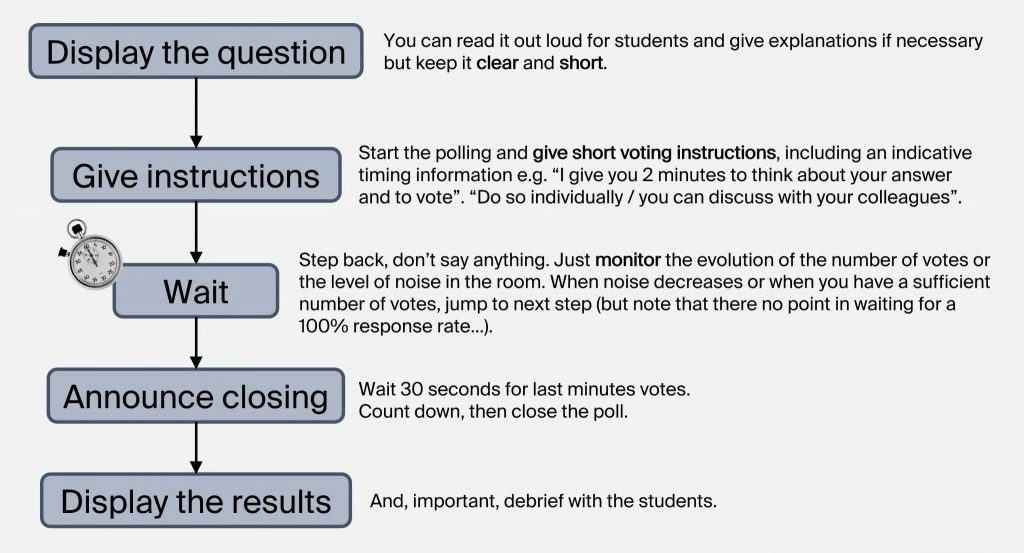
How to ask a question effectively?
Asking a question is both simple and subtle.
Follow these 5 steps:
Interaction strategies
Below are examples of strategies that you can use to foster interaction in your class using a Student Response System. These strategies rely on two key principles:
- Giving students time to think individually about their answer so they can form their own opinion.
- Allowing students to discuss their answer with their peers, which gives them the opportunity to explain their reasoning and confront it with that of others.

Think-Pair-Vote-Share
This strategy is the Student Response System-based version of the Think-Pair-Share activity (Lyman, 1981). The peer discussion part of this strategy gives students the opportunity to check their answer before sharing with the whole class, therefore decreasing barriers to participation. This strategy is therefore very useful for difficult questions where several answers are possible, or when your participation rate drops.
How to proceed?
|
|
You may also include a voting step between phases Think and Pair so that students commit to their individual answer before discussing with others. In that case, we suggest you not to show the resulting graph to students so that it doesn’t influence too much their opinion. With this additional step, this strategy is then very similar to the Peer Instruction strategy described below.
Peer Instruction
Developed by Harvard physicist Eric Mazur, Peer Instruction (Mazur, 1997) is a research-based, interactive teaching method which uses peer discussion as a way for students to deepen their understanding of a concept by learning from each other.
The figure below illustrates the principles of this method. In class, you start by giving a short lecture on a core idea or concept (you may also have asked students to study more detailed material at home). Then you ask an online interactive poll or question designed to expose common difficulties in understanding the material. If the results of the poll show that students are divided on the choice of the correct answer, you ask students to discuss the question by pairs or in groups. During this process, students verbalize their reasoning, debate and assess their understanding of the concepts, which is the goal of the method.
How to proceed?
|
1–3 min.
|
After the peer-discussion phase, the results of the second vote should show an increase in the proportion of correct answers.
However, it can happen that answers remain spread out, or even that the proportion of incorrect answers increases. This is usually a symptom of a misunderstanding – either the concept has not been understood, or the question or the response options are not sufficiently clear.
In such cases, it is recommended to start a whole group discussion to identify the reasons for the misunderstanding. You can ask students to explain their answers, for example:
- “Can someone who chose B explain why they made that choice?”
- “Would someone like to explain why they chose the answer they did?”
- “How did you arrive at this answer?”
- “Did anyone choose the same answer but follow a different reasoning?”
- “What made you eliminate/consider this option?”
- “What are you assuming when you state… ?”
It is very important at first to welcome contributions without commenting on them until different opinions have been heard. You can then moderate a discussion among students, or clarify as needed so that the correct answer is clearly identified.
You can find more information and resources on Peer Instruction here (in English):
- Turn To Your Neighbor, the official Peer Instruction blog
- Videos illustrating Peer Instruction @ University of California, San Diego
How to encourage participation?
Student Response Systems are not magical – participation is never guaranteed. We therefore suggest:
- Explaining to your students why you are using a Student Response System and how it can help them learn.
- Starting gently, for example with a simple question (e.g. demographic), an ice-breaker, or a “testing the system” question. Help students feel safe when interacting with you – building a participative climate can take time.
- Using clear and concise instructions.
- Giving students time to think.
Use silence and wait for the votes without saying or doing anything – this is difficult to do, but if you keep talking they will listen to you instead of reflecting and answering. - Asking students to discuss their answer with their peers before voting.
Verbalising and comparing their reasoning with others will reassure them and encourage participation. During these discussions, walk around the room to “take the temperature” and see what is happening. - Adapting to what is happening in the room.
Be flexible about participation rates and timing – give more time if students are actively discussing a question, but stop the vote if they start discussing last night’s party. - Always welcome students’ answers positively, even if they are incorrect. Focus on their reasoning and invite other students to share different views. Only then should you confirm the correct answer and why, and ensure that this is clear for everyone in the room.
You can find more ideas about audience participation in this article by Olivia Mitchell and this article by Jason Teteak (in English).
Other ideas
You can find more ideas and strategies for using interactive online polls on the following pages (in English):
- Techniques and question types @ Georgetown University
- Teaching with Clickers: Types of Activities @ University of Michigan
- Asking short questions on the EchoPoll website
Suggested reading
Please let us know if you find any broken links in the list below.
Online documents
3 raisons de faire voter les étudiants pendant les cours!, Ariane Dumont
Clickers on Derek Bruff’s Blog on Teaching and Technology
Tips for Successful « Clicker » Use, Douglas Duncan, University of Colorado
Writing effective clicker questions, Instructional Services of the University of Iowa
Teaching with clickers, Center for Research on Learning and Teaching, University of Michigan
The 3 best times to ask your students questions, Christopher Machielse
1 seconde pour répondre au prof!, Ariane Dumont
University websites on clickers
Teaching with personal response systems (« Clickers ») @ Harvard
Clickers Community of Practice @ Georgetown University
Teaching with clickers: Types of Activities @ University of Michigan
Teaching with clickers @ University of Iowa
Clicker Resources, Carl Wieman Science Education Initiative @ University of British Columbia
Research
Enhancing Student Learning in a Graduate Research and Statistics Course with Clickers, Lydia Kyei-Blankson (2009)
Clickers in Upper Division Courses, Stephanie Chasteen, Kathy Perkins, Steve Pollock & Mike Dubson (Physics, CU), AAPT Winter Meeting, Chicago (February 2009)
Peer Instruction: Ten Years of Experience and Results, Catherine H. Crouch & Eric Mazur, Am. J. Phys., 69, 970-977 (2001)
Clickers in the large classroom: Current research and best-practice tips, J.E. Caldwell, Life Sciences Education, 6(1), 9-20 (2007)
Why Peer Discussion Improves Student Performance on In-Class Concept Questions, M. Smith, W. Wood, W. Adams, C. Wieman, J. Knight, N. Guild & T. Su, Science, 323(5910), 122-124 (2009)
An empirical study of personal response technology for improving attendance and learning in a large class, A. Shapiro, Journal of the Scholarship of Teaching and Learning, 9(1), 13-26 (2009).

